 It may seem overwhelming and difficult, but it really isn’t! After getting a baby food cookbook for Christmas, I got really pumped and couldn’t wait til he was ready for solids! The cookbook is called Baby Love, written by Norah O’Donnell and Chef Geoff Tracy. Click here to find it on Amazon. The book is super easy to follow and has great tips for someone who is just starting out!
Shay and I started out strong and planned a night after work to make some our first batch. Now, I will say the first time we got together it was challenging, but we learned a lot and it got easier. We picked 4 recipes! Here are the lessons we learned that night:
- Leave the little ones with Daddy or get a babysitter! We both had our lil’ munchkins and while they were very well behaved, it was hard to relax and have fun with it when your trying to multi-task.
- Block out at least 2 hours for several recipes! I’ve done 1 recipe several times and been just fine doing it amongst chores, every day household things, etc. But 4 recipes in our first night was pretty ambitious! And we only finished 2!
- Spinach smells horrible when overcooked!
Most of you probably knew that one, but I thought I’d share it anyway!
- You don’t need a fancy food processor or blender. I just used my everyday blender. Although I’d love to try something like the Baby Breeza!
- Plan on preparing large batches and freezing them! I doubled most of the recipes!
- You don’t always need a recipe! As long as your dinner doesn’t have any ingredients that may not be baby-friendly, then throw it in the blender and freeze it too!!
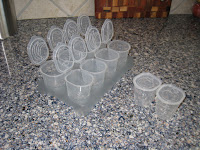
- Get containers that can be used to freeze, defrost and travel with! The book I mentioned above suggests ice cube trays. I started using ice cube trays, but hated that there were 2 more steps (1. putting the cubes into Ziplocs once they were frozen so they didn’t get freezer burn, then 2. finding another dish once you wanted to move it to the fridge for defrosting)! There are lots of products available that are specifically designed to hold serving size amounts! I absolutely love the ones I use. I wish I could find a link to them online, but the best I can do is a picture of my own (see below). They are from Babies R Us and they are the Babies R Us brand too! The best part is, you can put them in the freezer then transfer a whole tray at a time into the fridge and even grab one portion at a time when you’re “on the go”. Another side note, never use glass containers unless the glass is designed for freezing! It could burst or worse yet, crack unknowingly and leave tiny crystals in your baby’s yummy food!
Now, www.wholesomebabyfood.com says “For optimal quality and nutrient retention, keep frozen baby food cubes in the freezer for a maximum of 3 months.” so that is what I went by. But I didn't have any problem, because my lil’ guy was such a great eater, we ended up making it about every month to keep up!
Since I started, I find it really easy now to just throw some things in the oven or in a pot then into a blender!
Lil’ C’s favorite was sweet potatoes so I thought I share that recipe with you!
Perfectly Basic Sweet Potato (from Baby Love)
- Makes 36 ounces
- Age: 6 Months plus
Ingredients:
- 2 1/2 pounds sweet potato (about 2 medium sized potatoes or 1 really big one)
- 24 ounces of water
Steps:
1. Preheat Oven to 400 degrees F.
2. Cut the potatoes lengthwise.
3. Place potatoes flesh side down on a sheet tray.
4. Pour 8 ounces of the water onto the sheet tray.

5. Roast approximately 60 minutes until tender. The potatoes should be bubbling and caramelized
6. Allow to cool 10 - 15 minutes so you can hold the potatoes without a problem.


7. Spoon out the flesh and pour into the blender with remaining water. Puree until smooth.
8. Pour into ice cube trays (or whatever containers you have purchased) and allow to cool.

9. Wrap (if you used ice cube trays) and freeze.
I did this recipe before I had my nifty little baby food containers! But my favorite part about this recipe is the 60 minutes while they are cooking... you have time to do something else! Cook another baby food recipe, make dinner, laundry, play with your LO...or anything else that you want to get done!! Hope you enjoy and thanks again to Baby Love for making such easy, healthy recipes for our babies!!
Do any of you make your own baby food? If so, let us know your favorite tools and tips!!!


No comments:
Post a Comment